
Background
After doing the Christmas Countdown and the Snowman Snowfight, I wanted to get into something more mechanical. I got an old Dish Network dish that an uncle was throwing away (how could I turn that down!?), but I needed something to do with it. My brother came up with the idea for a pseudo North Pole NORAD type of display. Part of the impetus for this was my Great-Grandfather’s Christmas displays that are still running to this day (I never got to meet him, but I’ve seen his handy work MANY times and am always in awe of his skill with little to no formal education).
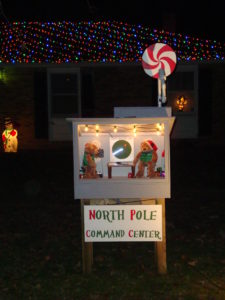
Things evolved from the original idea, but what I ended up wanting was two people monitoring Santa’s situation on Christmas Eve night from their command center up at the North Pole. While looking for dolls we could use, my wife and I found some stuffed bears in Christmas outfits at a thrift store, so that became our characters (instead of elves). We decided to have one talking on a walkie-talkie who would have a hand moving up and down, and then have the second one sitting in a rotating chair near a table that would simulate him swiveling. In addition to the two moving bears, I was going to put an animated radar display in the box and of course have a rotating dish on the roof (since that is how this all started).
Construction
I hadn’t designed a display like this, but I figured it would be pretty straightforward. The display is solid, but it might be bit overkill (in hindsight, I desperately need to cut the weight down). I used 2x6s as my base and ½” CDX plywood for the walls. I had 1x1s that I used as framing to lock in the walls to the ceiling and each other. We primed everything and then painted it all up.
The trickiest part was finding a way to add the Plexiglas front yet be able to remove it easily if I want to make any modifications inside. One of the things that people warned me about with plexi is that you cannot lock it down due to the expansion/contractions that happen when the temps change (will cause it to crack).
For the plexi, I ended up doing a pseudo framing. I used 1x1s and framed out the inside of the box about an inch inset from the front edge. I then cut the plexi to be about the same size of the opening (1/4” less in each direction to compensate for expansion), and then I made another frame that goes on the other side of the plexi (making a plexi sandwich with 1x1s as the bread). I can then secure the outer framing into place and the plexi is still floating so it can expand/contract as needed. To cut the plexi, I read about a trick that worked wonders. I used a plastic cutting blade in my table saw and installed it in reverse (so the teeth are running backwards). Then you make the blade slightly taller than the plexi and cut. This worked much better than trying to score it or cut through with a razor blade and you don’t even need to tape down the area you plan on cutting. One word of warning is that fumes from the plastic as it partially melts stink pretty bad (and I am sure are not good for you), so make sure you have some while ventilation while cutting.
The Radar
Having to get a PIC involved somehow, I wanted to make a sweeping animated radar display to track Santa’s movements. It is a pretty simple design that just repeats at a set rate over and over again. Everything is run off of 5V DC and the white LEDs are wired up in parallel and powered by a Darlington Transistor pair (because of the higher current that the PIC cannot safely source). The red LEDs are wired up the same way and turn on after the hand has swept by and slowly fade out. The fading is accomplished by using a changing Pulse Width Modulation (PWM) to duty cycle the amount of time the LED is actually on. If you do this fast enough the human eye should not be able to see the flicker (a lot of digital alarm clocks use this technique), and by reducing the amount of time the light has power in the duty cycle it gives the appearance that the light is fading out. Holes were drilled into a cut piece of Luan and the LEDs were poked through and hot glued into place. The circuit was wired up on a piece of perfboard with through-hole parts and attached to the back of the Luan. Here is the schematic and the source code for the radar.
Wiper Motors
A lot of people in the Christmas and Halloween hacker community like to use wiper motors (as in the motors used for wiper blades in a car) and so I decided that was how I was going to make my movements work and I bought some new wipers from Monster Guts (you can also pull them off of cars at a junkyard for much cheaper). One thing to realize is that wiper motors actually rotate 360° (even though your blades go back and forth), so you have to take rotary motion and turn it into other types of motion (unless you want something that turns 360°).
Another thing about wiper motors is that they are considered brushless DC motors, which is very important. This is good because it means you can swap the power and ground pins and reverse the direction the motor rotates (this isn’t necessary for my application). The other benefit is that you can vary the speed the motor rotates by varying the voltage applied to it. I found that at 3.3V the particular motor I had would rotate fine, but any lower and I couldn’t get the motor to start up from an “off” state. I will be running my motors off of 3.3V on the low speed setting (most of the wiper motors have a “high” and “low” speed setting) for a roughly 6RPM output. You can run these safely at up to 12V and get a much faster rotation (with a trade off of less torque). A good site for information all things wiper motors is Scary Terry’s Halloween prop site.
Animating Bears
Having no mechanical background (or skills), I spent most of my time trying to get the moving bears worked out. I originally was just going to have one bear moving (the one with the walkie), but my wife thought that the second bear swiveling in the chair would look better if he was actually turning, so that complicated things some (but made the display more interesting).
I was having trouble figuring out how to turn a rotating motion into a linear reciprocating motion with a pause at the top and bottom until I talked to a friend who is into cars as a hobby. He mentioned that what I was looking for sounded a lot like a cam. Researching cams I came a across a great site by Rob Ives who has a great breakdown (with very nice animations) to explains all things mechanical. There I saw a cam with a cam-follower in action and my walkie talkie bear had life. To make the cam, I cut out a piece of wood in the shape of a guitar pic (at least that is what it looks like to me). I tried to adjust it such that the time the walkie was at its apex equaled the time it was down (and the time it took to lift it matched the time it took to set it down). I had a few false starts with how to raise the rod up/down in a smooth motion until I saw a cam follower on Rob’s site that would fit my needs. I installed a lever on a hinge (my fulcrum) that would get raised and lowered as the cam rotated around. I then put another hinge on the end of the lever and welded a rod that would push the walkie-talkie up and pull it down (making the bear look like he was using the walkie).
With my walkie-talkie bear working, I turned my attention to my wife’s rotating bear. I figured I could reuse the same motor (that would save me complexity and money), but I didn’t want the bear to rotate in a complete 360°. Back on Rob’s site I started looking into cranks; they take a rotary motion and turn it into a reciprocating one. I then take that reciprocating motion and turn a wheel partially in a circle (making a back and forth motion). Having the mechanics figured out, I went out and got a small, 7”, Lazy Susan kit that was intended to be used in a kitchen for a rotating spice rack (and things of that ilk). That Lazy Susan will be what I rotate and the ball bearings will ease friction making for a smoother, more effortless rotation. I attached some wood to the Lazy Susan and extended a dowel rod up into the display to act as the swiveling barstool-like chair.
The Rotating Dish
The last step was to finally finish up the dish (what started everything). The dish has its own motor and uses a crank motion just like the sitting bear. I had initially planned on having the dish rotate around completely, but I decided at some point I would be adding a red blinking light to it, and it is easier to do that with things that don’t rotate completely, so I took the easy way out (plus I think it still serves its purpose). In the future, if I want to make it rotate completely and I still want a blinking light, I will need a slip-ring to make that happen.
Since the dish acts sort of like a giant wind sail and will be out in the elements, I needed a much sturdier lazy susan that the little one from Lowes. Using an idea borrowed from other online designs, I used two PVC toilet flanges that fit into each other to build my own (one has a longer neck than the other to offset them). To help keep things smooth I used Vaseline as a lubricant (though I think a silicon based lubricant might be a better option in the future).
<TANGENT> I spent an unusually long time trying to figure out the lengths of my rotating arm on the cranks for the rotating distances for the lazy susans until I realized it was very simple. What you need to know is the radius (r) of the lazy susan you want to turn (which could be how far from the center your rotating point is), and the amount of inches you would like to turn the lazy susan around in the circle (d). So, if we have a lazy susan of radius r=3 in. and we want to turn it a quarter of a turn (d= (1/4)*circumference= (1/4)*(2+pi+r)= 4.712 in.), we need the arm on the motor to be half of d (2.36 in.). This works pretty well to get you close to what you want to do, but the crank approach won’t work for turns more than 180°, so I try to keep mine close to 120° or less. </ TANGENT>
After all that effort, I put the dish up where it would be mounted to look at it and it looked very silly. The dish was much too large for the little display. Scrapping that I decided to make a dish out of plywood and PVC. My wife painted it up to give it a candy cane look.
Powering the Display
The display itself does not draw much power. The lights I settled on for inside the display are just standard 120VAC clear C7 Christmas lights. For the radar and the two motors I needed 5V DC and 3.3V DC respectively. I ended up buying a power supply from Electronic Goldmine which takes in 120VAC and outputs 5V @ 7A and 3.3V @ 10A. I then wired up the two wiper motors to the 3.3V output and used the 5V for the radar. I also installed a standard outlet underneath the display to plug wall power into and then it powers the lights and the power supply (or anything else I want to run without needing a separate extension cord).
The whole display draws about 400mA, or about 50W, so less than a normal incandescent light bulb!