***This project is now retired as I am using a new outdoor webcam***
Background
I had the Christmas Countdown up for a few years, but its viewing was limited to my neighborhood and it was calling out for a larger audience; I figured that a wireless webcam would fit the bill. The main problem with wireless webcams I found was that for exterior versions they are pretty costly, so I kept looking for alternatives. I ended up finding a pretty good site by Dick who was doing something similar and was very helpful.
The Enclosure
Since the camera is for indoor use only, I had to make a watertight enclosure for it. Making one very similar to Dick’s, I used 3” PVC and added a screw-on end cap In the back for access. I then added a small bolt in the bottom that fits into the mounting nut built into the webcam to hold it into place (adding some caulking to keep moisture out). On the front of the PVC, I cut it at an angle to try to make a small sunshield on the top to help keep the sun off the camera lens.
For power I added a small length of cord with a male end on it to plug into an extension cord. On the inside, I put a female plug and plugged the camera’s wallwart straight into it. To keep moisture out I use a Cord Grip from Remke to seal the hole up (you also need the locking nut RSP-006-L).
The last thing I needed was a way to seal up the front of the PVC. Much like Dick, I went with a 72mm lens filter that goes on the front of SLR camera lenses. This size is just a hair smaller than the inner diameter of the PVC, so it fits in fine and all that is needed is a little caulking to hold it into place and seal it shut. It is best to get a clear filter or a very slightly tinted one so you don’t make the picture too dark. I picked mine up on eBay for a few bucks.
Mounting
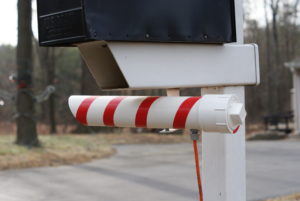
I decided that the best place to mount my camera was underneath my mailbox (out of the way, but as close to straight-on to the countdown as I could get). I ended up taking two pieces of leftover flat stock steel I had and bent them into L shaped brackets. I then mounted one bracket (an upside down ‘L’ shape) under my mailbox with a bolt and a second one (an ‘L’ shape) to the bottom of the PVC. Lastly, I connected the two L’s together with a bolt and nut so I can adjust the camera angle in the up/down direction and the bracket connected to the mailbox lets me adjust the left/right direction. At the end of the season everything can be broken down and put away until the following November.
The Camera
I ended up using the same camera as Dick (a Trendnet TV-IP100W) since he seemed to be having pretty good luck, the reviews were good, and the price was right (I got mine on eBay). The camera is pretty easy to setup and has pretty much all the features I could want. The first one has already died (probably due to the out of spec temperatures it experiences during the cold nights), but I bought a similar model since I was happy with it.
Currently the camera is setup to take a picture about once every three seconds and the website auto-refreshes the images so people can see what the countdown is actually showing. I would rather host video, but I don’t want to use that much upload bandwidth and have my ISP banging on my door to shut me down. With my current scheme if no one wants to look at the picture, it is never uploaded and I don’t waste any bandwidth.